总结与实战
方法论:学完就练,练完就用。做出来才是真的会。
📖 本节目标
学完本节,你将:
- ✅ 串联前端所有知识点
- ✅ 完成一个完整的实战项目
- ✅ 掌握 Vibe Coding 的核心工作流
预计用时:30 分钟
1. 知识回顾
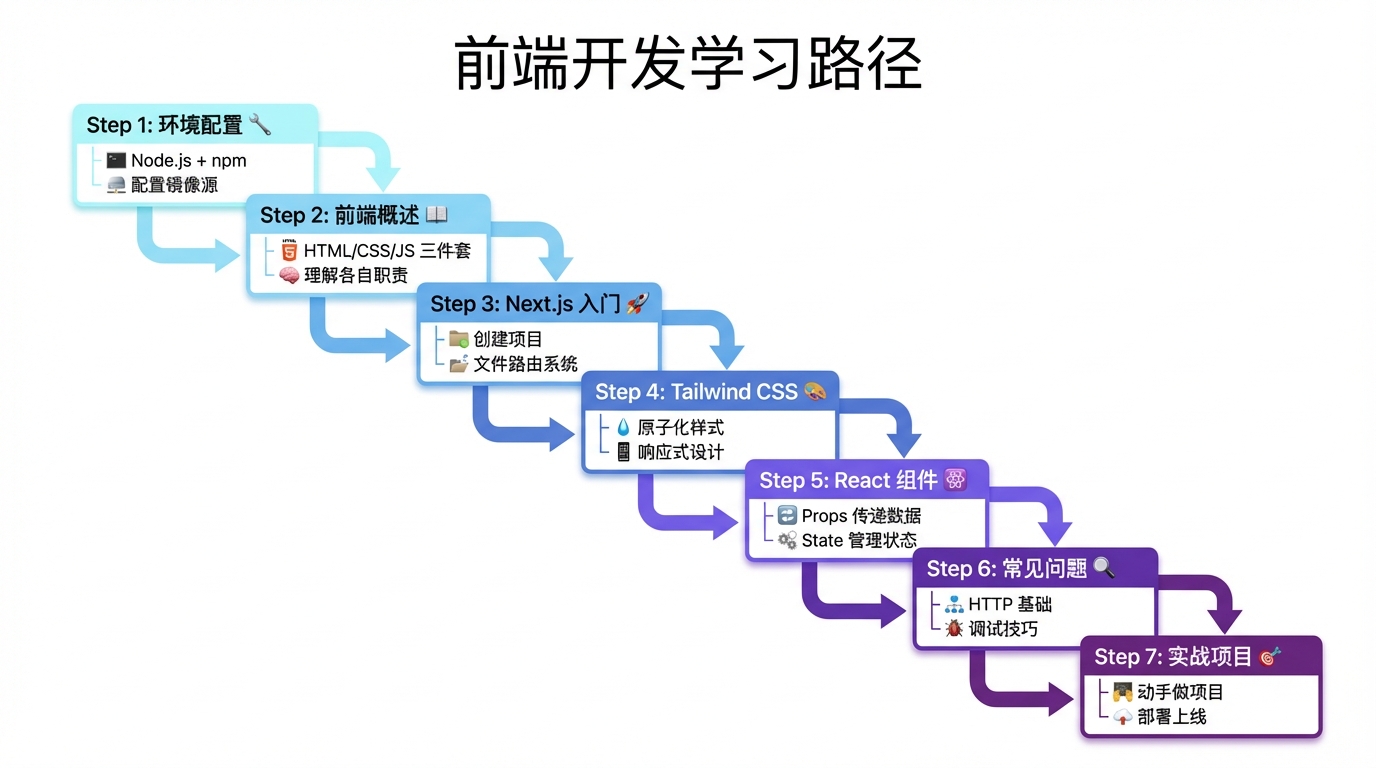
1.1 学习路径总览
┌─────────────────────────────────────────────────────────┐
│                    前端开发基础                          │
├─────────────────────────────────────────────────────────┤
│                                                         │
│   01_环境配置        安装 Node.js、npm                   │
│        ↓            配置镜像源、理解 package.json        │
│                                                         │
│   02_前端概述        HTML = 骨架                         │
│        ↓            CSS = 皮肤                          │
│                     JavaScript = 肌肉                   │
│                                                         │
│   03_Next.js入门     创建项目、文件路由                   │
│        ↓            layout.tsx、page.tsx                │
│                                                         │
│   04_Tailwind入门    原子化 CSS、响应式                   │
│        ↓            hover:、md:、lg:                    │
│                                                         │
│   05_React组件       Props 传递数据                      │
│        ↓            State 管理状态                      │
│                     'use client'                        │
│                                                         │
│   06_常见问题        HTTP 基础、浏览器工具                │
│        ↓            报错排查、有效求助                   │
│                                                         │
│   07_总结与实战      知识串联、动手实践    ← 你在这里     │
│                                                         │
└─────────────────────────────────────────────────────────┘
1.2 核心概念速查表
| 概念 | 一句话解释 | 代码示例 |
|---|---|---|
| HTML | 页面有什么内容 | <div>, <button> |
| CSS | 页面长什么样 | color: red |
| JavaScript | 页面能做什么 | onClick={() => {}} |
| Next.js | React 框架,文件即路由 | src/app/about/page.tsx → /about |
| Tailwind | CSS 写成类名 | className="bg-blue-500" |
| 组件 | 可复用的 UI 积木 | <Button text="提交" /> |
| Props | 外部传入的数据 | function Button({ text }) |
| State | 组件内部的记忆 | const [count, setCount] = useState(0) |
1.3 常用命令速查
# 创建项目
npx create-next-app@latest my-app

# 安装依赖
npm install

# 启动开发
npm run dev

# 构建生产
npm run build

# 配置镜像(下载慢时用)
npm config set registry https://registry.npmmirror.com
2. Vibe Coding 工作流
2.1 核心流程
需求描述 → AI 生成代码 → 运行查看 → 调整优化 → 完成
   │           │            │           │
   │           │            │           └── 复制错误问 AI
   │           │            └── npm run dev
   │           └── 把需求告诉 AI
   └── 想清楚要做什么
2.2 高效 Prompt 模板
创建页面:
帮我创建一个 Next.js 页面:
- 路径:/products
- 功能:显示产品列表
- 样式:使用 Tailwind CSS
- 布局:响应式,手机一列,电脑三列
创建组件:
帮我创建一个 React 组件:
- 名称:ProductCard
- Props:title, price, image, onBuy
- 样式:白色卡片,圆角阴影
- 交互:点击按钮调用 onBuy
修复问题:
我遇到了这个错误:
[粘贴完整错误信息]

我的代码是:
[粘贴相关代码]

请帮我分析原因并给出解决方案
3. 实战项目:个人简历页
3.1 项目目标
创建一个包含以下内容的个人简历网站:
- 首页:个人介绍
- 技能页:技能列表
- 项目页:项目展示
- 联系页:联系方式
3.2 步骤 1:创建项目
# 创建项目
npx create-next-app@latest my-resume

# 选择选项
✔ TypeScript? › Yes
✔ ESLint? › Yes
✔ Tailwind CSS? › Yes
✔ src/ directory? › Yes
✔ App Router? › Yes

# 进入项目并启动
cd my-resume
npm run dev
3.3 步骤 2:创建布局
修改 src/app/layout.tsx:
import Link from 'next/link'
import './globals.css'

export default function RootLayout({
  children,
}: {
  children: React.ReactNode
}) {
  return (
    <html lang="zh-CN">
      <body>
        {/* 导航栏 */}
        <nav className="bg-gray-800 text-white">
          <div className="max-w-4xl mx-auto px-4">
            <div className="flex justify-between items-center h-16">
              <span className="text-xl font-bold">我的简历</span>
              <div className="flex gap-6">
                <Link href="/" className="hover:text-blue-400">首页</Link>
                <Link href="/skills" className="hover:text-blue-400">技能</Link>
                <Link href="/projects" className="hover:text-blue-400">项目</Link>
                <Link href="/contact" className="hover:text-blue-400">联系</Link>
              </div>
            </div>
          </div>
        </nav>

        {/* 页面内容 */}
        <main className="max-w-4xl mx-auto px-4 py-8">
          {children}
        </main>

        {/* 页脚 */}
        <footer className="bg-gray-100 text-center py-4 text-gray-600">
          © 2024 我的简历 | 用 Next.js + Tailwind 构建
        </footer>
      </body>
    </html>
  )
}
3.4 步骤 3:创建首页
修改 src/app/page.tsx:
export default function HomePage() {
  return (
    <div className="text-center">
      {/* 头像和名字 */}
      <div className="mb-8">
        <div className="w-32 h-32 bg-gray-300 rounded-full mx-auto mb-4 flex items-center justify-center text-4xl">
          👤
        </div>
        <h1 className="text-3xl font-bold">你的名字</h1>
        <p className="text-gray-600 mt-2">前端开发者 | Vibe Coder</p>
      </div>

      {/* 简介 */}
      <div className="bg-white rounded-lg shadow p-6 text-left">
        <h2 className="text-xl font-bold mb-4">关于我</h2>
        <p className="text-gray-600 leading-relaxed">
          我是一名热爱技术的开发者,正在学习 Vibe Coding。
          我相信用 AI 可以加速开发,把想法快速变成现实。
          目前正在学习 Next.js、Tailwind CSS 和 React。
        </p>
      </div>
    </div>
  )
}
3.5 步骤 4:创建技能页
创建 src/app/skills/page.tsx:
const skills = [
  { name: 'HTML/CSS', level: 80 },
  { name: 'JavaScript', level: 70 },
  { name: 'React', level: 60 },
  { name: 'Next.js', level: 50 },
  { name: 'Tailwind CSS', level: 70 },
]

export default function SkillsPage() {
  return (
    <div>
      <h1 className="text-3xl font-bold mb-8">我的技能</h1>

      <div className="space-y-4">
        {skills.map((skill) => (
          <div key={skill.name} className="bg-white rounded-lg shadow p-4">
            <div className="flex justify-between mb-2">
              <span className="font-medium">{skill.name}</span>
              <span className="text-gray-500">{skill.level}%</span>
            </div>
            <div className="w-full bg-gray-200 rounded-full h-3">
              <div
                className="bg-blue-500 h-3 rounded-full"
                style={{ width: `${skill.level}%` }}
              />
            </div>
          </div>
        ))}
      </div>
    </div>
  )
}
3.6 步骤 5:创建项目页
创建 src/app/projects/page.tsx:
const projects = [
  {
    title: '个人简历网站',
    description: '使用 Next.js + Tailwind CSS 构建的个人简历',
    tags: ['Next.js', 'Tailwind'],
  },
  {
    title: '待办事项 App',
    description: '一个简单的待办事项管理应用',
    tags: ['React', 'useState'],
  },
]

export default function ProjectsPage() {
  return (
    <div>
      <h1 className="text-3xl font-bold mb-8">我的项目</h1>

      <div className="grid md:grid-cols-2 gap-6">
        {projects.map((project) => (
          <div key={project.title} className="bg-white rounded-lg shadow p-6">
            <h3 className="text-xl font-bold mb-2">{project.title}</h3>
            <p className="text-gray-600 mb-4">{project.description}</p>
            <div className="flex gap-2">
              {project.tags.map((tag) => (
                <span
                  key={tag}
                  className="bg-blue-100 text-blue-600 px-2 py-1 rounded text-sm"
                >
                  {tag}
                </span>
              ))}
            </div>
          </div>
        ))}
      </div>
    </div>
  )
}
3.7 步骤 6:创建联系页
创建 src/app/contact/page.tsx:
'use client'
import { useState } from 'react'

export default function ContactPage() {
  const [submitted, setSubmitted] = useState(false)

  const handleSubmit = (e: React.FormEvent) => {
    e.preventDefault()
    setSubmitted(true)
  }

  if (submitted) {
    return (
      <div className="text-center py-12">
        <div className="text-6xl mb-4">✅</div>
        <h2 className="text-2xl font-bold">感谢你的留言!</h2>
        <p className="text-gray-600 mt-2">我会尽快回复你</p>
      </div>
    )
  }

  return (
    <div>
      <h1 className="text-3xl font-bold mb-8">联系我</h1>

      <form onSubmit={handleSubmit} className="bg-white rounded-lg shadow p-6">
        <div className="mb-4">
          <label className="block text-sm font-medium mb-1">你的名字</label>
          <input
            type="text"
            required
            className="w-full border rounded-lg px-3 py-2 focus:border-blue-500 focus:ring-1"
            placeholder="请输入名字"
          />
        </div>

        <div className="mb-4">
          <label className="block text-sm font-medium mb-1">邮箱地址</label>
          <input
            type="email"
            required
            className="w-full border rounded-lg px-3 py-2 focus:border-blue-500 focus:ring-1"
            placeholder="请输入邮箱"
          />
        </div>

        <div className="mb-4">
          <label className="block text-sm font-medium mb-1">留言内容</label>
          <textarea
            required
            rows={4}
            className="w-full border rounded-lg px-3 py-2 focus:border-blue-500 focus:ring-1"
            placeholder="请输入留言"
          />
        </div>

        <button
          type="submit"
          className="w-full bg-blue-500 hover:bg-blue-600 text-white py-2 rounded-lg"
        >
          发送留言
        </button>
      </form>
    </div>
  )
}
4. 自我检测清单
完成学习后,用这个清单检测自己:
环境配置
- 能运行
node -v和npm -v看到版本号 - 知道
npm install是干什么的 - 知道 package.json 记录了什么
前端基础
- 能说出 HTML、CSS、JS 各自的作用
- 知道前端和后端的区别
Next.js
- 能用
npx create-next-app创建项目 - 知道
src/app/about/page.tsx对应什么网址 - 会用
Link组件跳转页面
Tailwind CSS
- 知道
p-4是什么意思 - 会用
flex justify-center items-center居中 - 知道
md:前缀是干什么的
React 组件
- 能创建一个简单的组件
- 知道 Props 和 State 的区别
- 知道什么时候要加
'use client'
问题排查
- 知道按 F12 打开开发者工具
- 会在 Console 看错误信息
- 会在 Network 看接口请求
5. 下一步建议
短期目标(1-2 周)
- 完成个人简历项目
- 尝试修改样式和内容
- 部署到 Vercel(免费)
中期目标(1 个月)
- 学习后端基础
- 尝试做一个带数据库的项目
- 实现用户登录功能
长期目标(3 个月)
- 完成一个完整的产品(如知识付费平台)
- 实现支付功能
- 正式上线运营
📝 小结
前端开发的核心:
- 工具:Node.js + npm + Next.js
- 结构:HTML(骨架)+ CSS(皮肤)+ JS(肌肉)
- 框架:React 组件化 + Tailwind 原子化
- 方法:Vibe Coding = 描述需求 + AI 生成 + 调试优化
记住:
- 不用背代码,用到就问 AI
- 不用求完美,能跑就是成功
- 多做项目,做中学最快
📚 完成!
恭喜你完成了前端开发基础的学习!
👉 后端开发基础
学习如何用 FastAPI 创建后端 API,让你的网站能存储和读取数据。
返回 前端开发基础 查看完整目录。